Session/artefact to be observed/reviewed: BA1 U4 Simple Bookbinding
Size of student group: 18 (approx.)
Reviewee: Chelsie Coates
Reviewer: Alba Gomez Urquia
Part One
What is the context of this session/artefact within the curriculum?
Hands on workshop teaching 2 basic methods for bookbinding to support Y1 students in their Unit 4 “Horizons” outcome where they are expected to make a physical publication
How long have you been working with this group and in what capacity?
Since Autumn 2025 when they started the course (they are Y1 students)
What are the intended or expected learning outcomes?
- To understand the purpose of bookbinding.
- To use and contextualise the process of bookbinding.
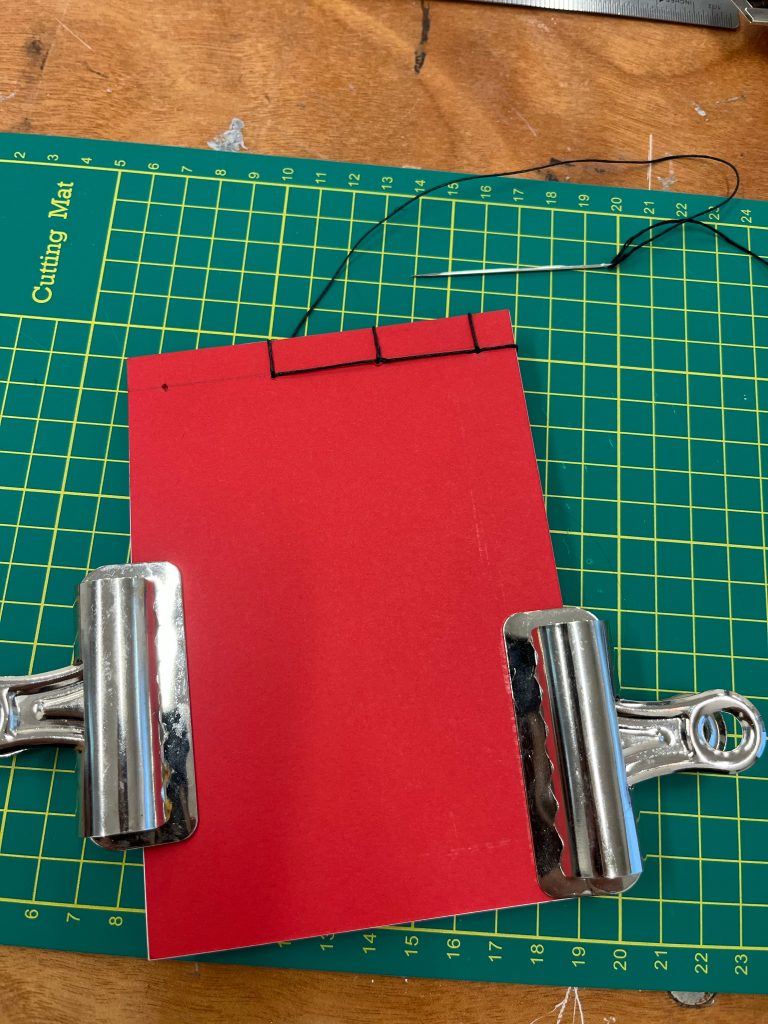
- To successfully complete 2 bookbinding methods (3-hole pamphlet stitch & 4-hole stab bind)
- What are the anticipated outputs (anything students will make/do)?
- Complete 2 small A6 books using 3-hole pamphlet stitch & 4-hole stab bind
Are there potential difficulties or specific areas of concern?
Larger group than my usual size running this session. I have run this session for max 12 over the past couple years but not specifically aligned with this unit since revalidation.
How will students be informed of the observation/review?
Verbally at start of session.
What would you particularly like feedback on?
Student engagement. Presentation quality. Historical & cultural reference quality.
How will feedback be exchanged?
Email once form has been filled
Part Two
Presentations
- It contextualised the importance of this workshop within their unit and brief, and particularly the relevance for a painting course successfully.
- Strong historical and cultural context, as well as hand-picked reference images.
- Appropriate use of technical vocabulary. I personally appreciated how Chelsie cared to spell certain key words like “awl” to make sure those who English isn’t their first language didn’t fall behind.
- Excellent examples of the use of book binding within creative practices nowadays. Inspiring content!
- Chelsie appreciated Ian’s inputs and valued his knowledge. I enjoyed seeing sketchbooks bound by him, a really good example of how the outcome of this workshop could be relevant to the students attending.
- Having a QR that redirects you to more information / resources at the end of the presentation seems an effective way to expand the knowledge of those students truly interested in the topic/process.
- I would have liked to see more visuals and graphics showing every step, rather than a written list. All that text seemed messy and hard to follow. A series of photos showing key stages of the binding process might be easier to follow whilst students are simultaneously doing it.
- The written description could be a good document to look at for more in-depth explanations or to refresh.
Hands on Activity / Demo
- Both tools and process were well introduced. All tools were clearly laid out in front of every student and clear instructions were given as to what was going to be used when.
- Chelsie moved around the table to make sure everyone was following, and helped 1-2-1 those who were falling behind.
- Instructions for both right-handed and left-handed were given at times. That was very inclusive and thoughtful.
- The group seemed confident to ask for help when they got stuck.
- Enough time to finish the task was given, however it is hard to accommodate for everyone’s different timing.
- It is hard to teach at this scale (threads, needles, tiny holes…). It is essential for everyone to pay close attention to the demonstration before trying to do it. I feel some people got lost because they weren’t looking when the demonstration was taking place.
- Having a structured demo is key. For this particular process, making a clear distinction between DEMO and MAKING time can make the difference. For instance, show step 1 and 2 and then give a set time for everyone to do complete it. Visuals can be shown on the screen for students to refer to. Check everyone is on the same stage and then progress to step 3 and 4.
- Asking questions during the demo can also help students make sense of the steps, rather than just memorise / copy them.
Participation
- The group (around 12 people) seemed a bit sleepy and not very motivated. I believe it would be beneficial to activate the group even during the presentation, so that when we get to the hands-on activity, the team feels already awake and engaged.
- Perhaps, asking more questions such as “does anyone know how this is called?”, “what do you think we use this tool for” would make the group a bit more participative.
- For instance, when told about the grain direction, the group was prompt with a question: what is the grain direction of the piece of paper on our table? The previous explanation had been clear, and the answer was actually shown on the screen, however it took long for someone to answer.
- I don’t think that is lack of motivation or confidence, but perhaps it has more to do with the time of the week it is taught (Friday morning). It would be advisable to look into ways to activate the group before starting the workshop. Perhaps starting the class with some chat about what happened last week, or for someone to explain what the brief is or if anyone has a favourite book binder or a favourite artist’s book they’d like to recommend. The teacher should go first if nobody dares.
Additionally
- I enjoyed having music in the background during the making part of the activity. It created a comfortable environment to work in and encourage activation.
- Giving information about specialist shops were students can buy tools and materials is a good practice.
- The environment was very welcoming and experimentation and questions were encouraged.
- Maybe leave more time to share results at the end. Have a wrap up conclusion.
Part Three
In response to my peer review, I will reflect on previous comments below:
Presentation:
Through my current presentation, the overuse of text is distracting & confusing for many students, especially ESL. Including this information as an additional post-session handout would be more successful in supporting future student learning. By cutting down on text in-session and replacing each slide with a visual diagram to aid learners, I would aim for a reduction in confusion & better understanding in-session. Going forwards, I would cut out these slides & draw my own diagrams for each stage of binding. Using the step-by-step text as a digital handout for referring back to at a later date post-session.
Hands-on Activity/ Demo:
It was noted that the difference in pacing in the group caused some friction. E.g. fast-paced learners waiting around. I have written more about changes I could make in Case Study 1, but essentially, shifting my focus from teacher-centered learning to student-led and collaborative learning would help with the pacing of the session, giving students more autonomy and confidence to continue developing their skills outside of the classroom. For instance, grouping students in mixed skill level pairs or threes to support completing and understanding the process, as well as fostering a community within the cohort.
Additionally, to refocus students who are not paying attention to the demonstration, and therefore fall behind, I could adjust my language around the timed structure of the session. By focusing on distinguishing ‘watching’ and ‘doing’ time, students would hopefully be more likely to stay on track during the process. For instance, I could spend 2 minutes demonstrating 3 steps and then give 5 mins for students to complete this process. Once everyone has completed these stages, we would move as a group to the next set of steps.
Alba also mentions asking questions during steps. For this workshop, I could ask whether students know what the next step might be, or ask a more confident student to demonstrate for me. This might encourage comprehension & (again) peer-to-peer learning.
Participation:
It was noted the sleepy/unmotivated nature of my group. The time of day (Fri morning) definitively plays a part in this. To activate my group prior to the hands-on making, I could introduce OBL as an icebreaker tool at the start of the session. By offering examples in front of them & having them discern information about the materials, construction & context in small groups, this might awaken some more interest in the process & make them more comfortable to speak up during the presentation aspect of the session. Additionally, by asking more questions during the introduction of equipment e.g. can anyone name this tool, this might encourage students to more actively participate.
Alba’s suggestion about having an informal discussion about non-related topics or even easing into the topic by discussing favorite book-related artists interested me to encourage student participation. I agree that I do not think they lack interest, but I do think confidence plays a role since they are all 1st year BA students.
Additional notes:
Leaving some time at the end to share results & have a small group discussion on the processes e.g. challenges, parts they enjoyed would help in concluding what they have learnt. I could bring the session back to the learning outcomes to ensure they are clear on what they have learnt, or if they will need to see me again for additional understanding.
Leave a Reply